Max : CV and NLP
Building, Managing and Deploying Azure AI Solutions
Requirements :
AI-102 => Designing and implementing a Microsoft Azure AI Solution
Certification - Azure AI Associate Engineer Certification
Exam time : 2 hours (Including 20 mins survey)
About 42 Questions
There is no hands on coding, but you need to understand the code. You can access the hands on lab. You can choose the language (C# or Python)
A Software that mimics human like capabilities
AI is built on top of ML, and ML is all data and algorithms. This data is used to train prediction models.
After model testing and tuning, we can deploy the models and providing a new image we can infer from it
ML is built on top of DS, which uses Math and statistics to analyse data.
You have labelled data, that you split into train-test. You use that data and train the model, which can then be deployed from there itself. When you give a new data for inference, you can then use it to retrain and fine tune the model.
All of these services are going to be used with each other. They can, but usually do not run separately
These are built using other services, and trained on large data
To leverage a service, we need an Azure Subscription. A Subscription is a billing Boundary for many things
You Provision an Instance of your service into you Azure Cloud Subscription. Within the Subscription, you can use many of the different Regions.
This will give you your Cognitive Service Resource
az account list-locations -o table
When we deploy a service and get the resource provisioned, we have a choice. The resource can be :
Eg : Custom Vision - Gives you the option to break up prediction and training into different instances.
A resource has an the following :
Remember that the service is talking to the Endpoint URI.
This means that this URI can have its own Firewall
Uses the CognitiveServicesManagement Service tag (Services like Anomaly Detection and Azure OpenAI supports these)
How do you use these services? Assume that you have the Region, the Endpoint URI and the Key.
You need to mention the following in your request (App settings) :
{
	"CognitiveServicesEndpoint" : "Your Endpoint",
	"CognitiveServicesKey" : "Your Key"
}
You program will take these settings and construct a payload from it.
Outside of the free Single Service, Azure Services are consumption based. You pay based on the number of interactions you do to it
Multi service does not have any free option.
Can be set on :
The key point is that we are creating an azure cloud resource. We can call this from any other services that we want (On premise, or any other service), but this service is running on the cloud and we pay per use of this service
If you have a car, can you reliably assume that you will always have a high speed connection to use the service and get the response?
Sometimes, you need the service running on the Edge / On-Premisus. The Cloud is not always a good fit
The other option for provisioning is using Containers
They have a Host (Usually Linux)
They create some user-mode sandboxed environments (Isolated from each other). Each of these environments runs a particular container image.
You can get these images from a Registry
You can create container images.
Azure Cognitive Services - Set of container images that you can use.
When you run them, you need to specify some parameters
This still needs some internet connectivity (To accept the EULA and Billing info), but after that it is mostly local.
This has a lot of containers in it, including speech vision etc
Example : docker pull <URI>
| Feature | Image |
|---|---|
| Key Phrase Extraction | mcr.microsoft.com/azure-cognitive-services/textanalytics/keyphrase |
| Language Detection | mcr.microsoft.com/azure-cognitive-services/textanalytics/language |
| Sentiment Analysis | mcr.microsoft.com/azure-cognitive-services/textanalytics/sentiment |
| Named Entity Recognition | mcr.microsoft.com/product/azure-cognitive-services/textanalytics/language/about |
| Text Analytics for health | mcr.microsoft.com/product/azure-cognitive-services/textanalytics/healthcare/about |
| Translator | mcr.microsoft.com/product/azure-cognitive-services/translator/text-translation/about |
| Summarization | mcr.microsoft.com/azure-cognitive-services/textanalytics/summarization |
| Feature | Image |
|---|---|
| Speech to text | mcr.microsoft.com/product/azure-cognitive-services/speechservices/speech-to-text/about |
| Custom Speech to text | mcr.microsoft.com/product/azure-cognitive-services/speechservices/custom-speech-to-text/about |
| Neural Text to speech | mcr.microsoft.com/product/azure-cognitive-services/speechservices/neural-text-to-speech/about |
| Speech language detection | mcr.microsoft.com/product/azure-cognitive-services/speechservices/language-detection/about |
| Feature | Image |
|---|---|
| Read OCR | mcr.microsoft.com/product/azure-cognitive-services/vision/read/about |
| Spatial analysis | mcr.microsoft.com/product/azure-cognitive-services/vision/spatial-analysis/about |
Send and image and get a JSON response (With some confidence level report)
from azure.ai.vision.imageanalysis import ImageAnalysisClient
from azure.ai.vision.imageanalysis.models import VisualFeatures
from azure.core.credentials import AzureKeyCredential

client = ImageAnalysisClient(
    endpoint=os.environ["ENDPOINT"],
    credential=AzureKeyCredential(os.environ["KEY"])
)

result = client.analyze(
    image_url="<url>",
    visual_features=[VisualFeatures.CAPTION, VisualFeatures.READ],
    gender_neutral_caption=True,
    language="en",
)
Available visual features are contained in the VisualFeatures enum:
Output :
{
  "apim-request-id": "abcde-1234-5678-9012-f1g2h3i4j5k6",
  "modelVersion": "<version>",
  "denseCaptionsResult": {
    "values": [
      {
        "text": "a house in the woods",
        "confidence": 0.7055229544639587,
        "boundingBox": {
          "x": 0,
          "y": 0,
          "w": 640,
          "h": 640
        }
      },
      {
        "text": "a trailer with a door and windows",
        "confidence": 0.6675070524215698,
        "boundingBox": {
          "x": 214,
          "y": 434,
          "w": 154,
          "h": 108
        }
      }
    ]
  },
  "metadata": {
    "width": 640,
    "height": 640
  }
}
Service : Azure Video Indexer and Video Analyzer Service
The Video Analyzer service provides a portal website that you can use to upload, view, and analyze videos interactively
Azure Video Indexer includes predefined models that can recognize well-known celebrities, do OCR, and transcribe spoken phrases into text
Custom models :
2 ways to integrate with custom applications
https://api.videoindexer.ai/Auth/<location>/Accounts/<accountId>/AccessToken{
"accountId": "SampleAccountId",
"id": "30e66ec1b1",
"partition": null,
"externalId": null,
"metadata": null,
"name": "test3",
"description": null,
"created": "2018-04-25T16=50=00.967+00=00",
"lastModified": "2018-04-25T16=58=13.409+00=00",
"lastIndexed": "2018-04-25T16=50=12.991+00=00",
"privacyMode": "Private",
"userName": "SampleUserName",
"isOwned": true,
"isBase": true,
"state": "Processing",
"processingProgress": "",
"durationInSeconds": 13,
"thumbnailVideoId": "30e66ec1b1",
"thumbnailId": "55848b7b-8be7-4285-893e-cdc366e09133",
"social": {
"likedByUser": false,
"likes": 0,
"views": 0
},
"searchMatches": [],
"indexingPreset": "Default",
"streamingPreset": "Default",
"sourceLanguage": "en-US"
}
Predict the class label based on main subject.
Gets the coordinates along with the class
You need to ensure privacy, transparency and all things equally (Not gender and age are removed)
Two ways :
!faceservice.png
!moreface.png
The Face service provides functionality that you can use for:
If you want to use the identification, recognition, and verification features of Face, you'll need to apply for the Limited Access policy and get approval before these features are available.
So you get :
Considerations for Face Analysis
When building a solution that uses facial data, considerations include (but aren't limited to):
Call the Analyze Image function (SDK or equivalent REST method), specifying People as one of the visual features to be returned.
{
  "modelVersion": "2023-10-01",
  "metadata": {
    "width": 400,
    "height": 600
  },
  "peopleResult": {
    "values": [
      {
        "boundingBox": {
          "x": 0,
          "y": 56,
          "w": 101,
          "h": 189
        },
        "confidence": 0.9474349617958069
      },
      {
        "boundingBox": {
          "x": 402,
          "y": 96,
          "w": 124,
          "h": 156
        },
        "confidence": 0.9310565276194865
      },
    ...
    ]
  }
}
From images and documents, printed and handwritten
Has 2 APIs as well
To interpret human intent from natural language. Uses Azure AI Language Service
Two types :
!extraction-development-lifecycle.png
Creating an entity extraction model typically follows a similar path to most Azure AI Language service features:
For the best performance, you'll need to use both high quality data to train the model and clearly defined entity types.
High quality data will let you spend less time refining and yield better results from your model.
Entities need to also be carefully considered, and defined as distinctly as possible. Avoid ambiguous entities (such as two names next to each other on a bank statement), as it will make the model struggle to differentiate. If having some ambiguous entities is required, make sure to have more examples for your model to learn from so it can understand the difference.
Keeping your entities distinct will also go a long way in helping your model's performance. For example, trying to extract something like "Contact info" that could be a phone number, social media handle, or email address would require several examples to correctly teach your model. Instead, try to break them down into more specific entities such as "Phone", "Email", and "Social media" and let the model label whichever type of contact information it finds.
You need to tag data, train it and test it. Remember that you always need to train-test-split
Recall -
Precision -
F1 Score -
You need to create a Knowledge Base of question and answer pairs that can be queried using natural language input.
You can pass in FAQs, Files, Built in Chit-Chat QnA pairs etc. This will have the questions and the answers. You can also pass in synonyms of the words. From here, you can create a bot that will query the base and get the answer.
QnA vs Language Understanding
!qnaservice.png
Using a KB
{
  "question": "What do I need to do to cancel a reservation?",
  "top": 2,
  "scoreThreshold": 20,
  "strictFilters": [
    {
      "name": "category",
      "value": "api"
    }
  ]
}
| Property | Description |
|---|---|
| question | Question to send to the knowledge base. |
| top | Maximum number of answers to be returned. |
| scoreThreshold | Score threshold for answers returned. |
| strictFilters | Limit to only answers that contain the specified metadata. |
Output
{
  "answers": [
    {
      "score": 27.74823341616769,
      "id": 20,
      "answer": "Call us on 555 123 4567 to cancel a reservation.",
      "questions": [
        "How can I cancel a reservation?"
      ],
      "metadata": [
        {
          "name": "category",
          "value": "api"
        }
      ]
    }
  ]
}
Improving QnA
{
    "synonyms": [
        {
            "alterations": [
                "reservation",
                "booking"
                ]
        }
    ]
}
{
    "kind": "KeyPhraseExtraction",
    "parameters": {
        "modelVersion": "latest"
    },
    "analysisInput":{
        "documents":[
            {
              "id": "1",
              "language": "en",
              "text": "You must be the change you wish
                       to see in the world."
            },
            {
              "id": "2",
              "language": "en",
              "text": "The journey of a thousand miles
                       begins with a single step."
            }
        ]
    }
}
{
    "kind": "KeyPhraseExtractionResults",
    "results": {
    "documents": [
        {
         "id": "1",
         "keyPhrases": [
           "change",
           "world"
         ],
         "warnings": []
       },
       {
         "id": "2",
         "keyPhrases": [
           "miles",
           "single step",
           "journey"
         ],
         "warnings": []
       }
],
    "errors": [],
    "modelVersion": "2021-06-01"
    }
}
{
  "kind": "SentimentAnalysis",
  "parameters": {
    "modelVersion": "latest"
  },
  "analysisInput": {
    "documents": [
      {
        "id": "1",
        "language": "en",
        "text": "Good morning!"
      }
    ]
  }
}
{
  "kind": "SentimentAnalysisResults",
  "results": {
    "documents": [
      {
        "id": "1",
        "sentiment": "positive",
        "confidenceScores": {
          "positive": 0.89,
          "neutral": 0.1,
          "negative": 0.01
        },
        "sentences": [
          {
            "sentiment": "positive",
            "confidenceScores": {
              "positive": 0.89,
              "neutral": 0.1,
              "negative": 0.01
            },
            "offset": 0,
            "length": 13,
            "text": "Good morning!"
          }
        ],
        "warnings": []
      }
    ],
    "errors": [],
    "modelVersion": "2022-11-01"
  }
}
{
  "kind": "EntityRecognition",
  "parameters": {
    "modelVersion": "latest"
  },
  "analysisInput": {
    "documents": [
      {
        "id": "1",
        "language": "en",
        "text": "Joe went to London on Saturday"
      }
    ]
  }
}
{
	"kind": "EntityRecognitionResults",
	 "results": {
		  "documents":[
			  {
				  "entities":[
				  {
					"text":"Joe",
					"category":"Person",
					"offset":0,
					"length":3,
					"confidenceScore":0.62
				  },
				  {
					"text":"London",
					"category":"Location",
					"subcategory":"GPE",
					"offset":12,
					"length":6,
					"confidenceScore":0.88
				  },
				  {
					"text":"Saturday",
					"category":"DateTime",
					"subcategory":"Date",
					"offset":22,
					"length":8,
					"confidenceScore":0.8
				  }
				],
				"id":"1",
				"warnings":[]
			  }
		  ],
		  "errors":[],
		  "modelVersion":"2021-01-15"
	}
}
{
  "kind": "EntityLinking",
  "parameters": {
    "modelVersion": "latest"
  },
  "analysisInput": {
    "documents": [
      {
        "id": "1",
        "language": "en",
        "text": "I saw Venus shining in the sky"
      }
    ]
  }
}
{
  "kind": "EntityLinkingResults",
  "results": {
    "documents": [
      {
        "id": "1",
        "entities": [
          {
            "bingId": "89253af3-5b63-e620-9227-f839138139f6",
            "name": "Venus",
            "matches": [
              {
                "text": "Venus",
                "offset": 6,
                "length": 5,
                "confidenceScore": 0.01
              }
            ],
            "language": "en",
            "id": "Venus",
            "url": "https://en.wikipedia.org/wiki/Venus",
            "dataSource": "Wikipedia"
          }
        ],
        "warnings": []
      }
    ],
    "errors": [],
    "modelVersion": "2021-06-01"
  }
}
#More Language Translation Tasks
#Creating Speech Enabled Apps with Azure
Use Azure AI Speech Service
2 ways to detect :
Configuration Files :
These will go and create a SpeechRecognizer object. This returns things like The duration and the text
Requirements
If the operation was successful, the Reason property has the enumerated value RecognizedSpeech, the Text property contains the transcription in the original language. You can also access a Translations property which contains a dictionary of the translations (using the two-character ISO language code, such as "en" for English, as a key).
The same Config files as above
2 APIs :
You can also add Audio Format, Voices etc to the configs.
This creates a SpeechSynthesizer object.
Inputs are given in two forms :
Use Azure AI Translator Service
Speech to text, but you have the source and the target language.
You need to use the short codes here.
To use translation via the SDK, you need:
The TranslationRecognizer returns translated transcriptions of spoken input - essentially translating audible speech to text.
You can also synthesize the translation as speech to create speech-to-speech translation solutions. There are two ways you can accomplish this.
You can only use event-based synthesis when translating to a single target language.
When you want to perform 1:1 translation (translating from one source language into a single target language), you can use event-based synthesis to capture the translation as an audio stream. To do this, you need to:
Specify the desired voice for the translated speech in the TranslationConfig. Create an event handler for the TranslationRecognizer object's Synthesizing event. In the event handler, use the GetAudio() method of the Result parameter to retrieve the byte stream of translated audio. The specific code used to implement an event handler varies depending on the programming language you're using. See the C# and Python examples in the Speech SDK documentation.
Manual synthesis is an alternative approach to event-based synthesis that doesn't require you to implement an event handler. You can use manual synthesis to generate audio translations for one or more target languages.
Manual synthesis of translations is essentially just the combination of two separate operations in which you:
Can be of two types :
Best idea for individual users.
Eg : You can use Reinforcement Learning here (If you rate that you don't like a recommended movie, then it will improve next time)
Until now, everything we have done includes something that we need to build before we use it. Now, we will look at solutions where we can directly use the things.
These form a function without you having to do anything.
Uses Azure Document Intelligence Service
Prebuilt models to recognize forms
Custom Model Building :
Several Models exist, based on the specific form types
If you don't have good structured data :
What Prebuilt Models Extract
You need
poller = document_analysis_client.begin_analyze_document_from_url(
    "prebuilt-document", docUrl)
result: AnalyzeResult = poller.result()
It can recognize entities such as people, organizations, and dates and it runs against the whole document, not just key-value pairs. This approach ensures that, when structural complexity has prevented the model extracting a key-value pair, an entity can be extracted instead. Remember, however, that sometimes a single piece of text might return both a key-value pair and an entity.Types of Entities you can detect
Person. The name of a person.PersonType. A job title or role.Location. Buildings, geographical features, geopolitical entities.Organization. Companies, government bodies, sports clubs, musical bands, and other groups.Event. Social gatherings, historical events, anniversaries.Product. Objects bought and sold.Skill. A capability belonging to a person.Address. Mailing address for a physical location.Phone number. Dialing codes and numbers for mobile phones and landlines.Email. Email addresses.URL. Webpage addresses.IP Address. Network addresses for computer hardware.DateTime. Calendar dates and times of day.Quantity. Numerical measurements with their units.Using Financial Data and Receipts
More Resources
Discussed in Anomaly detection, just a prebuilt model.
Data Monitoring and Anomaly detection in Time Series Data (Tune model and alerts for metrics)
Similar to Vision Service, does everything in one (Face detection, people tracking, shot detection, content labelling, emotion detection etc)
Make it easier to read
Conversational Interactions
Layers to this Solution : -> Azure Bot Service -> Exposed as a Bot Framework Service (API) -> Called by Bot Framework SDK
Available Templates :
Activity Handlers : There are different event methods that you need to override to handle different types of activities
Others : Bot Framework Composer, Power Virtual Agents
We have huge amounts of data. To extract from it, and make it available in different ways for us to use, we need ACS.
ACS is a cloud based solution for the indexing and the querying on a wide range of data sources
Data can be in :
You can use Cognitive Services to enhance data (Like extracting text from image, or translation etc)
This is its own complete solution, not part of a multi-resource service
Tiers :
What this service does is create an index. From there, you need two things : Storage and Searching
According to the guide, if you have just Read, then you need two replicas. If you have read and write, you need 3 (For 99.9% resilience)
You can have a maximum of 36 Search Units
Not just the raw data, but you can extract information from it.
You can also create Custom Skillets (#Creating Custom Skills for Azure AI Search) using Azure Functions :
This will return an endpoint URI, which points to a WebAPI Skill (To be consumed as part of your skill)
If you want a field returned, you can mark it as Retrievable
There is an autocomplete options, sentence suggestions (Using Suggestor, you can register certain fields)
You can use the Language Studio
You can use Lucene query parser instead of basic search
Geospatial Functions
LLMs are trained on fast amounts of data, with lot of training time and resources
It is token based payment (Pay as you go)
Models are Read-Only
Use Cases :
The more specific the prompt, the better the response. So, apart from user prompt, you may also add a System Prompt.
LLMs are trained on the data till Sep 2021, so how do we access beyond that / custom datasets?
You can describe an API and make it available to the model in the Grounding Process.
Hence, you can upload and use your own data. OpenAI will then bring it in (as a Knowledge Base) that it can look up and give better results.
Uses Azure Document Intelligence - Vision API that extracts key-value pairs and table data from form documents.
Uses of Document Intelligence :
Uses OCR and deep learning to extract text, key-value pairs, selection marks and tables from documents
Custom models can be trained through the Azure Document Intelligence Studio
!Screenshot 2024-05-25 at 5.33.05 PM.png
!Screenshot 2024-05-25 at 5.33.09 PM.png
endpoint = "YOUR_DOC_INTELLIGENCE_ENDPOINT"
key = "YOUR_DOC_INTELLIGENCE_KEY"

model_id = "YOUR_CUSTOM_BUILT_MODEL_ID"
formUrl = "YOUR_DOCUMENT"

document_analysis_client = DocumentAnalysisClient(
    endpoint=endpoint, credential=AzureKeyCredential(key)
)

# Make sure your document's type is included in the list of document types the custom model can analyze
task = document_analysis_client.begin_analyze_document_from_url(model_id, formUrl)
result = task.result()
Sample output: Successful response has the analyzeResult key that contains the contents extracted and an array of pages containing info about the doc content.
{
	"status": "succeeded",
	"createdDateTime": "2023-10-18T23:39:50Z",
	"lastUpdatedDateTime": "2023-10-18T23:39:54Z",
	"analyzeResult": {
		"apiVersion": "2022-08-31",
		"modelId": "DocIntelModel",
		"stringIndexType": "utf16CodeUnit",
		"content": "Purchase Order\nHero Limited\nCompany Phone: 555-348-6512 Website: www.herolimited.com Email: accounts@herolimited.com\nPurchase Order\nDated As: 12/20/2020 Purchase Order #: 948284\nShipped To Vendor Name: Balozi Khamisi Company Name: Higgly Wiggly Books Address: 938 NE Burner Road Boulder City, CO 92848 Phone: 938-294-2949\nShipped From Name: Kidane Tsehaye Company Name: Jupiter Book Supply Address: 383 N Kinnick Road Seattle, WA 38383\nPhone: 932-299-0292\nDetails\nQuantity\nUnit Price\nTotal\nBindings\n20\n1.00\n20.00\nCovers Small\n20\n1.00\n20.00\nFeather Bookmark\n20\n5.00\n100.00\nCopper Swirl Marker\n20\n5.00\n100.00\nSUBTOTAL\n$140.00\nTAX\n$4.00\nTOTAL\n$144.00\nKidane Tsehaye\nManager\nKidane Tsehaye\nAdditional Notes: Do not Jostle Box. Unpack carefully. Enjoy. Jupiter Book Supply will refund you 50% per book if returned within 60 days of reading and offer you 25% off you next total purchase.",
		"pages": [
			{
				"pageNumber": 1,
				"angle": 0,
				"width": 1159,
				"height": 1486,
				"unit": "pixel",
				"words": [
					{
						"content": "Purchase",
						"polygon": [
							89,
							90,
							174,
							91,
							174,
							112,
							88,
							112
						],
						"confidence": 0.996,
						"span": {
							"offset": 0,
							"length": 8
						}
					},
					{
						"content": "Order",
						"polygon": [
							178,
							91,
							237,
							91,
							236,
							113,
							178,
							112
						],
						"confidence": 0.997,
						"span": {
							"offset": 9,
							"length": 5
						}
					},
                    ...
To create an Azure AI Document Intelligence resource in Azure and obtain connection details, complete these steps:
When you write an application that uses Azure AI Document Intelligence, you need two pieces of information to connect to the resource:
To obtain these details:
The following code shows how to use these connection details to connect your application to Azure AI Document Intelligence. In this example, a sample document at a specified URL is submitted for analysis to the general document model. Replace <endpoint> and <access-key> with the connection details you obtained from the Azure portal:
from azure.core.credentials import AzureKeyCredential
from azure.ai.documentintelligence import DocumentIntelligenceClient
from azure.ai.documentintelligence.models import AnalyzeResult

endpoint = "<your-endpoint>"
key = "<your-key>"

docUrl = "<url-of-document-to-analyze>"

document_analysis_client = DocumentIntelligenceClient(endpoint=endpoint,
    credential=AzureKeyCredential(key))

poller = document_analysis_client.begin_analyze_document_from_url(
    "prebuilt-document", docUrl)
result: AnalyzeResult = poller.result()
Summary :
If you're using the Standard pricing tier, you can add up to 100 custom models into a single composed model. If you're using the Free pricing tier, you can only add up to 5 custom models.
Azure AI Search supports these scenarios by enabling you to define a knowledge store in the skillset that encapsulates your enrichment pipeline. The knowledge store consists of projections of the enriched data, which can be JSON objects, tables, or image files. When an indexer runs the pipeline to create or update an index, the projections are generated and persisted in the knowledge store
Projections in Azure AI Search are ways to format and store the enriched data produced by AI skills during the indexing process
The projections of data to be stored in your knowledge store are based on the document structures generated by the enrichment pipeline in your indexing process. Each skill in your skillset iteratively builds a JSON representation of the enriched data for the documents being indexed, and you can persist some or all of the fields in the document as projections.
The process of indexing incrementally creates a complex document that contains the various output fields from the skills in the skillset. This can result in a schema that is difficult to work with, and which includes collections of primitive data values that don't map easily to well-formed JSON.
To simplify the mapping of these field values to projections in a knowledge store, it's common to use the Shaper skill to create a new, field containing a simpler structure for the fields you want to map to projections.
For example, consider the following Shaper skill definition :
{
  "@odata.type": "#Microsoft.Skills.Util.ShaperSkill",
  "name": "define-projection",
  "description": "Prepare projection fields",
  "context": "/document",
  "inputs": [
    {
      "name": "file_name",
      "source": "/document/metadata_content_name"
    },
    {
      "name": "url",
      "source": "/document/url"
    },
    {
      "name": "sentiment",
      "source": "/document/sentimentScore"
    },
    {
      "name": "key_phrases",
      "source": null,
      "sourceContext": "/document/merged_content/keyphrases/*",
      "inputs": [
        {
          "name": "phrase",
          "source": "/document/merged_content/keyphrases/*"
        }
      ]
    }
  ],
  "outputs": [
    {
      "name": "output",
      "targetName": "projection"
    }
  ]
}
Output Projection :
{
    "file_name": "file_name.pdf",
    "url": "https://<storage_path>/file_name.pdf",
    "sentiment": 1.0,
    "key_phrases": [
        {
            "phrase": "first key phrase"
        },
        {
            "phrase": "second key phrase"
        },
        {
            "phrase": "third key phrase"
        },
        ...
    ]
}
The resulting JSON document is well-formed, and easier to map to a projection in a knowledge store than the more complex document that has been built iteratively by the previous skills in the enrichment pipeline.
Create a knowledgeStore object in the skillsets that specifies the Azure Storage connection string for the storage account where you want to create projections, and the definitions of the projections themselves.
You can define object projections, table projections, and file projections depending on what you want to store; however note that you must define a separate projection for each type of projection, even though each projection contains lists for tables, objects, and files. Projection types are mutually exclusive in a projection definition, so only one of the projection type lists can be populated. If you create all three kinds of projection, you must include a projection for each type; as shown here:
"knowledgeStore": {
      "storageConnectionString": "<storage_connection_string>",
      "projections": [
        {
            "objects": [
                {
                "storageContainer": "<container>",
                "source": "/projection"
                }
            ],
            "tables": [],
            "files": []
        },
        {
            "objects": [],
            "tables": [
                {
                "tableName": "KeyPhrases",
                "generatedKeyName": "keyphrase_id",
                "source": "projection/key_phrases/*",
                },
                {
                "tableName": "docs",
                "generatedKeyName": "document_id",
                "source": "/projection"
                }
            ],
            "files": []
        },
        {
            "objects": [],
            "tables": [],
            "files": [
                {
                "storageContainer": "<container>",
                "source": "/document/normalized_images/*"
                }
            ]
        }
    ]
 }
For object and file projections, the specified container will be created if it does not already exist. An Azure Storage table will be created for each table projection, with the mapped fields and a unique key field with the name specified in the generatedKeyName property. These key fields can be used to define relational joins between the tables for analysis and reporting.
The input schema for a custom skill defines a JSON structure containing a record for each document to be processed. Each Document has a unique identified, and a data payload with one or more inputs, like this:
{
    "values": [
      {
        "recordId": "<unique_identifier>",
        "data":
           {
             "<input1_name>":  "<input1_value>",
             "<input2_name>": "<input2_value>",
             ...
           }
      },
      {
        "recordId": "<unique_identifier>",
        "data":
           {
             "<input1_name>":  "<input1_value>",
             "<input2_name>": "<input2_value>",
             ...
           }
      },
      ...
    ]
}
Output Schema :
{
    "values": [
      {
        "recordId": "<unique_identifier_from_input>",
        "data":
           {
             "<output1_name>":  "<output1_value>",
              ...
           },
         "errors": [...],
         "warnings": [...]
      },
      {
        "recordId": "< unique_identifier_from_input>",
        "data":
           {
             "<output1_name>":  "<output1_value>",
              ...
           },
         "errors": [...],
         "warnings": [...]
      },
      ...
    ]
}
To integrate a custom skill into your indexing solution, you must add a skill for it to a skillset using the Custom.WebApiSkill skill type.
The skill definition must:
{
    "skills": [
      ...,
      {
        "@odata.type": "#Microsoft.Skills.Custom.WebApiSkill",
        "description": "<custom skill description>",
        "uri": "https://<web_api_endpoint>?<params>",
        "httpHeaders": {
            "<header_name>": "<header_value>"
        },
        "context": "/document/<where_to_apply_skill>",
        "inputs": [
          {
            "name": "<input1_name>",
            "source": "/document/<path_to_input_field>"
          }
        ],
        "outputs": [
          {
            "name": "<output1_name>",
            "targetName": "<optional_field_name>"
          }
        ]
      }
  ]
}
Depending on the pricing tier you select, you can optimize your solution for scalability and availability by creating replicas and partitions.
4 main components
The indexing process works by creating a document for each indexed entity. During indexing, an enrichment pipeline iteratively builds the documents that combine metadata from the data source with enriched fields extracted by cognitive skills. You can think of each indexed document as a JSON structure, which initially consists of a document with the index fields you have mapped to fields extracted directly from the source data, like this:
When the documents in the data source contain images, you can configure the indexer to extract the image data and place each image in a normalized_images collection, like this:
document
document
For example, you could run an optical character recognition (OCR) skill for each image in the normalized images collection to extract any text they contain:
document
document
The fields in the final document structure at the end of the pipeline are mapped to index fields by the indexer in one of two ways:
Suppose you want to find documents containing the text London that have an author field value of Reviewer
search=London+author='Reviewer'
queryType=Simple
Using OData : (Odata $filter expressions are case sensititve)
search=London
$filter=author eq 'Reviewer'
queryType=Full
Filtering by fields:
search=*
facet=author

or

search=*
$filter=author eq 'selected-facet-value-here'
search=*
$orderby=last_modified desc
You need to make use of the orderby
After you've added a suggester, you can use the suggestion and autocomplete REST API endpoints or the .NET DocumentsOperationsExtensions.Suggest and DocumentsOperationsExtensions.Autocomplete methods to submit a partial search term and retrieve a list of suggested results or autocompleted terms to display in the user interface.
Custom Storing and Result Boosting
Synonyms
To enable a field to be included in the results, you must make it retrievable.
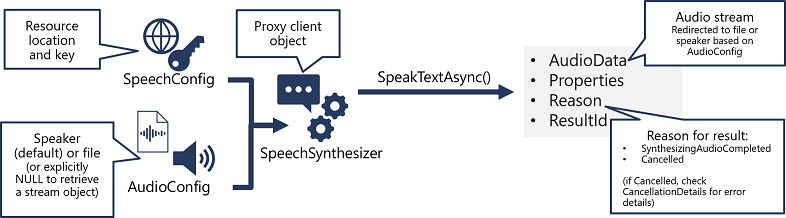
Azure AI Speech provides APIs that you can use to build speech-enabled applications. This includes:
Provisioning a Resource : Create a resource. To use the SDK you need the following:
The Azure AI Speech service supports speech recognition through two REST APIs:
You can use either API for interactive speech recognition, depending on the expected length of the spoken input. You can also use the Speech to text API for batch transcription, transcribing multiple audio files to text as a batch operation.
You can learn more about the REST APIs in the Speech to text REST API documentation. In practice, most interactive speech-enabled applications use the Speech service through a (programming) language-specific SDK.
If the operation was successful, the Reason property has the enumerated value RecognizedSpeech, and the Text property contains the transcription. Other possible values for Result include NoMatch (indicating that the audio was successfully parsed but no speech was recognized) or Canceled, indicating that an error occurred (in which case, you can check the Properties collection for the CancellationReason property to determine what went wrong).
As with speech recognition, in practice most interactive speech-enabled applications are built using the Azure AI Speech SDK.
The pattern for implementing speech synthesis is similar to that of speech recognition:
When speech has been successfully synthesized, the Reason property is set to the SynthesizingAudioCompleted enumeration and the AudioData property contains the audio stream (which, depending on the AudioConfig may have been automatically sent to a speaker or file).
The Azure AI Speech service supports multiple output formats for the audio stream that is generated by speech synthesis. Depending on your specific needs, you can choose a format based on the required:
The supported formats are indicated in the SDK using the SpeechSynthesisOutputFormat enumeration. For example, SpeechSynthesisOutputFormat.Riff24Khz16BitMonoPcm.
To specify the required output format, use the SetSpeechSynthesisOutputFormat method of the SpeechConfig object:
speechConfig.SetSpeechSynthesisOutputFormat(SpeechSynthesisOutputFormat.Riff24Khz16BitMonoPcm);
For a full list of supported formats and their enumeration values, see the Azure AI Speech SDK documentation.
The Azure AI Speech service provides multiple voices that you can use to personalize your speech-enabled applications. There are two kinds of voice that you can use:
Voices are identified by names that indicate a locale and a person's name - for example en-GB-George.
To specify a voice for speech synthesis in the SpeechConfig, set its SpeechSynthesisVoiceName property to the voice you want to use:
C#Copy
speechConfig.SpeechSynthesisVoiceName = "en-GB-George";
For information about voices, see the Azure AI Speech SDK documentation.
While the Azure AI Speech SDK enables you to submit plain text to be synthesized into speech (for example, by using the SpeakTextAsync() method), the service also supports an XML-based syntax for describing characteristics of the speech you want to generate. This Speech Synthesis Markup Language (SSML) syntax offers greater control over how the spoken output sounds, enabling you to:
For example, consider the following SSML:
<speak version="1.0" xmlns="http://www.w3.org/2001/10/synthesis"
                     xmlns:mstts="https://www.w3.org/2001/mstts" xml:lang="en-US">
    <voice name="en-US-AriaNeural">
        <mstts:express-as style="cheerful">
          I say tomato
        </mstts:express-as>
    </voice>
    <voice name="en-US-GuyNeural">
        I say <phoneme alphabet="sapi" ph="t ao m ae t ow"> tomato </phoneme>.
        <break strength="weak"/>Lets call the whole thing off!
    </voice>
</speak>
This SSML specifies a spoken dialog between two different neural voices, like this:
To submit an SSML description to the Speech service, you can use the SpeakSsmlAsync() method, like this:
speechSynthesizer.SpeakSsmlAsync(ssml_string);
For more information about SSML, see the Azure AI Speech SDK documentation.
Utterances are the phrases that a user might enter when interacting with an application that uses your language model. An intent represents a task or action the user wants to perform, or more simply the meaning of an utterance. You create a model by defining intents and associating them with one or more utterances.
For example, consider the following list of intents and associated utterances:
After you've identified the intents your model must support, it's important to capture various different example utterances for each intent. Collect utterances that you think users will enter; including utterances meaning the same thing but that are constructed in different ways. Keep these guidelines in mind:
Entities are used to add specific context to intents. For example, you might define a TurnOnDevice intent that can be applied to multiple devices, and use entities to define the different devices.
Consider the following utterances, intents, and entities:
| Utterance | Intent | Entities |
|---|---|---|
| What is the time? | GetTime | |
| What time is it in London? | GetTime | Location (London) |
| What's the weather forecast for Paris? | GetWeather | Location (Paris) |
| Will I need an umbrella tonight? | GetWeather | Time (tonight) |
| What's the forecast for Seattle tomorrow? | GetWeather | Location (Seattle), Time (tomorrow) |
| Turn the light on. | TurnOnDevice | Device (light) |
| Switch on the fan. | TurnOnDevice | Device (fan) |
You can split entities into a few different component types:
<YOUR-ENDPOINT>/language/analyze-text/jobs?api-version=<API-VERSION>
The body contains several documents.
Sample Response :
<...>
"entities":[
    {
        "text":"Seattle",
        "category":"Location",
        "subcategory":"GPE",
        "offset":45,
        "length":7,
        "confidenceScore":0.99
    },
    {
        "text":"next week",
        "category":"DateTime",
        "subcategory":"DateRange",
        "offset":104,
        "length":9,
        "confidenceScore":0.8
    }
]
<...>
A full list of recognized entity categories is available in the NER docs. Examples of when you'd want custom NER include specific legal or bank data, knowledge mining to enhance catalog search, or looking for specific text for audit policies. Each one of these projects requires a specific set of entities and data it needs to extract.
To submit an extraction task, the API requires the JSON body to specify which task to execute. For custom NER, the task for the JSON payload is CustomEntityRecognition.
Your payload will look similar to the following JSON:
{
    "displayName": "string",
    "analysisInput": {
        "documents": [
            {
                "id": "doc1",
                "text": "string"
            },
            {
                "id": "doc2",
                "text": "string"
            }
        ]
    },
    "tasks": [
        {
            "kind": "CustomEntityRecognition",
            "taskName": "MyRecognitionTaskName",
            "parameters": {
            "projectName": "MyProject",
            "deploymentName": "MyDeployment"
            }
        }
    ]
}
The Azure AI Language service enforces the following restrictions:
See the Service limits for Azure AI Language page for detailed information.
Labeling, or tagging, your data correctly is an important part of the process to create a custom entity extraction model. Labels identify examples of specific entities in text used to train the model. Three things to focus on are:
Language Studio is the most straight forward method for labeling your data. Language Studio allows you to see the file, select the beginning and end of your entity, and specify which entity it is.
Each label that you identify gets saved into a file that lives in your storage account with your dataset, in an auto-generated JSON file. This file then gets used by the model to learn how to extract custom entities. It's possible to provide this file when creating your project (if you're importing the same labels from a different project, for example) however it must be in the Accepted custom NER data formats. For example:
{
  "projectFileVersion": "{DATE}",
  "stringIndexType": "Utf16CodeUnit",
  "metadata": {
    "projectKind": "CustomEntityRecognition",
    "storageInputContainerName": "{CONTAINER-NAME}",
    "projectName": "{PROJECT-NAME}",
    "multilingual": false,
    "description": "Project-description",
    "language": "en-us",
    "settings": {}
  },
  "assets": {
    "projectKind": "CustomEntityRecognition",
    "entities": [
      {
        "category": "Entity1"
      },
      {
        "category": "Entity2"
      }
    ],
    "documents": [
      {
        "location": "{DOCUMENT-NAME}",
        "language": "{LANGUAGE-CODE}",
        "dataset": "{DATASET}",
        "entities": [
          {
            "regionOffset": 0,
            "regionLength": 500,
            "labels": [
              {
                "category": "Entity1",
                "offset": 25,
                "length": 10
              },
              {
                "category": "Entity2",
                "offset": 120,
                "length": 8
              }
            ]
          }
        ]
      },
      {
        "location": "{DOCUMENT-NAME}",
        "language": "{LANGUAGE-CODE}",
        "dataset": "{DATASET}",
        "entities": [
          {
            "regionOffset": 0,
            "regionLength": 100,
            "labels": [
              {
                "category": "Entity2",
                "offset": 20,
                "length": 5
              }
            ]
          }
        ]
      }
    ]
  }
}
| Field | Description |
|---|---|
| documents | Array of labeled documents |
| location | Path to file within container connected to the project |
| language | Language of the file |
| entities | Array of present entities in the current document |
| regionOffset | Inclusive character position for start of text |
| regionLength | Length in characters of the data used in training |
| category | Name of entity to extract |
| labels | Array of labeled entities in the files |
| offset | Inclusive character position for start of entity |
| length | Length in characters of the entity |
| dataset | Which dataset the file is assigned to |
Training and evaluating your model is an iterative process of adding data and labels to your training dataset to teach the model more accurately. To know what types of data and labels need to be improved, Language Studio provides scoring in the View model details page on the left hand pane.
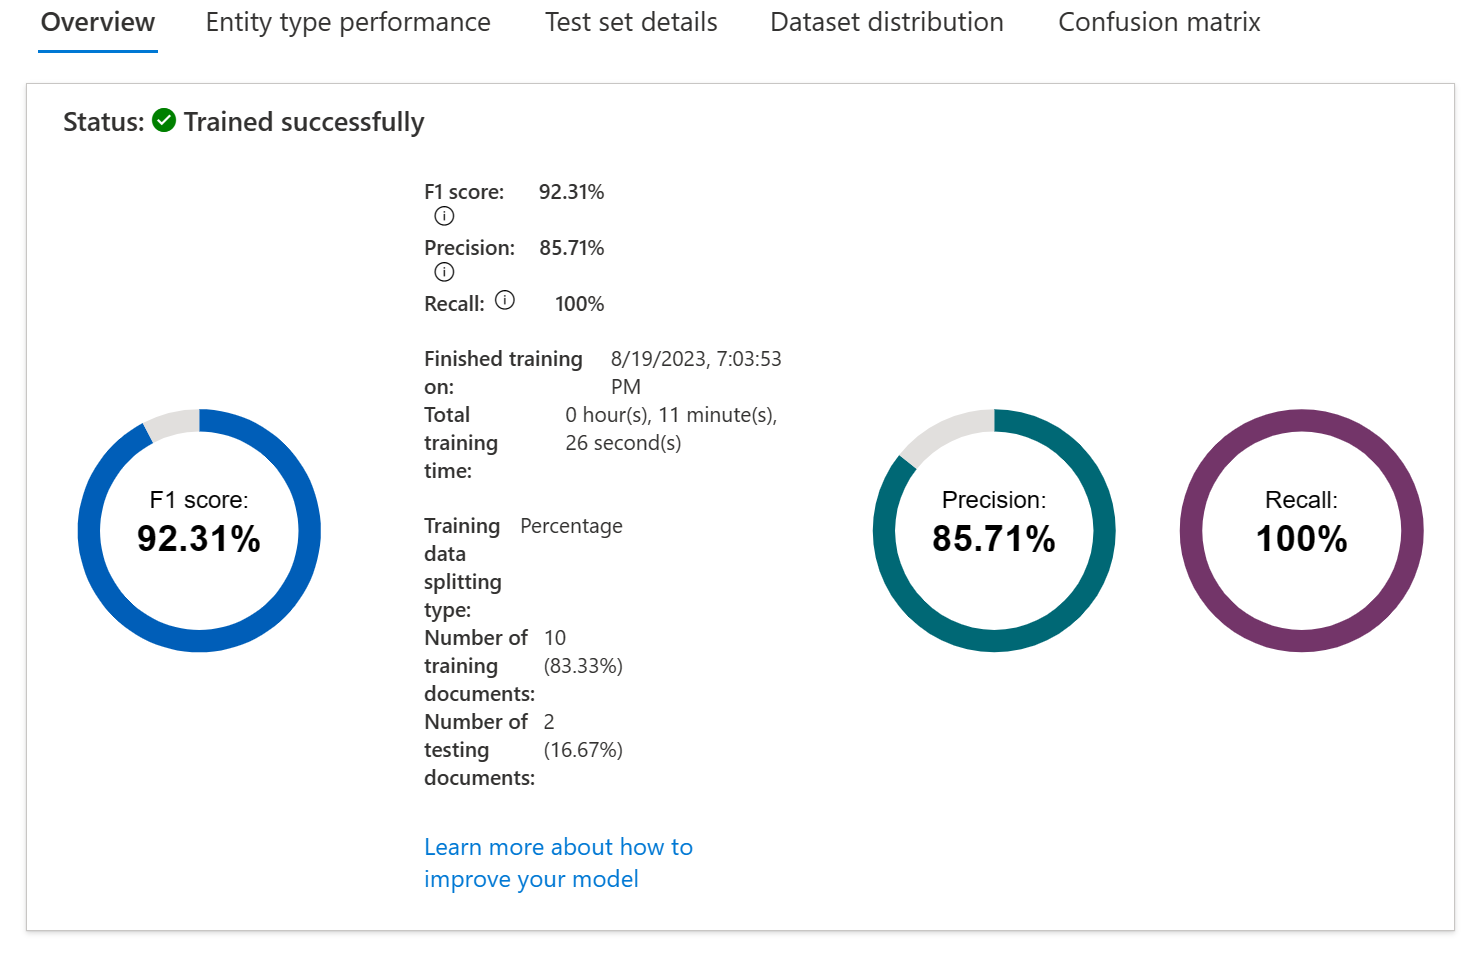
Individual entities and your overall model score are broken down into three metrics to explain how they're performing and where they need to improve.
Ideally we want our model to score well in both precision and recall, which means the entity recognition works well. If both metrics have a low score, it means the model is both struggling to recognize entities in the document, and when it does extract that entity, it doesn't assign it the correct label with high confidence.
If precision is low but recall is high, it means that the model recognizes the entity well but doesn't label it as the correct entity type.
If precision is high but recall is low, it means that the model doesn't always recognize the entity, but when the model extracts the entity, the correct label is applied.
On the same View model details page, there's another tab on the top for the Confusion matrix. This view provides a visual table of all the entities and how each performed, giving a complete view of the model and where it's falling short.
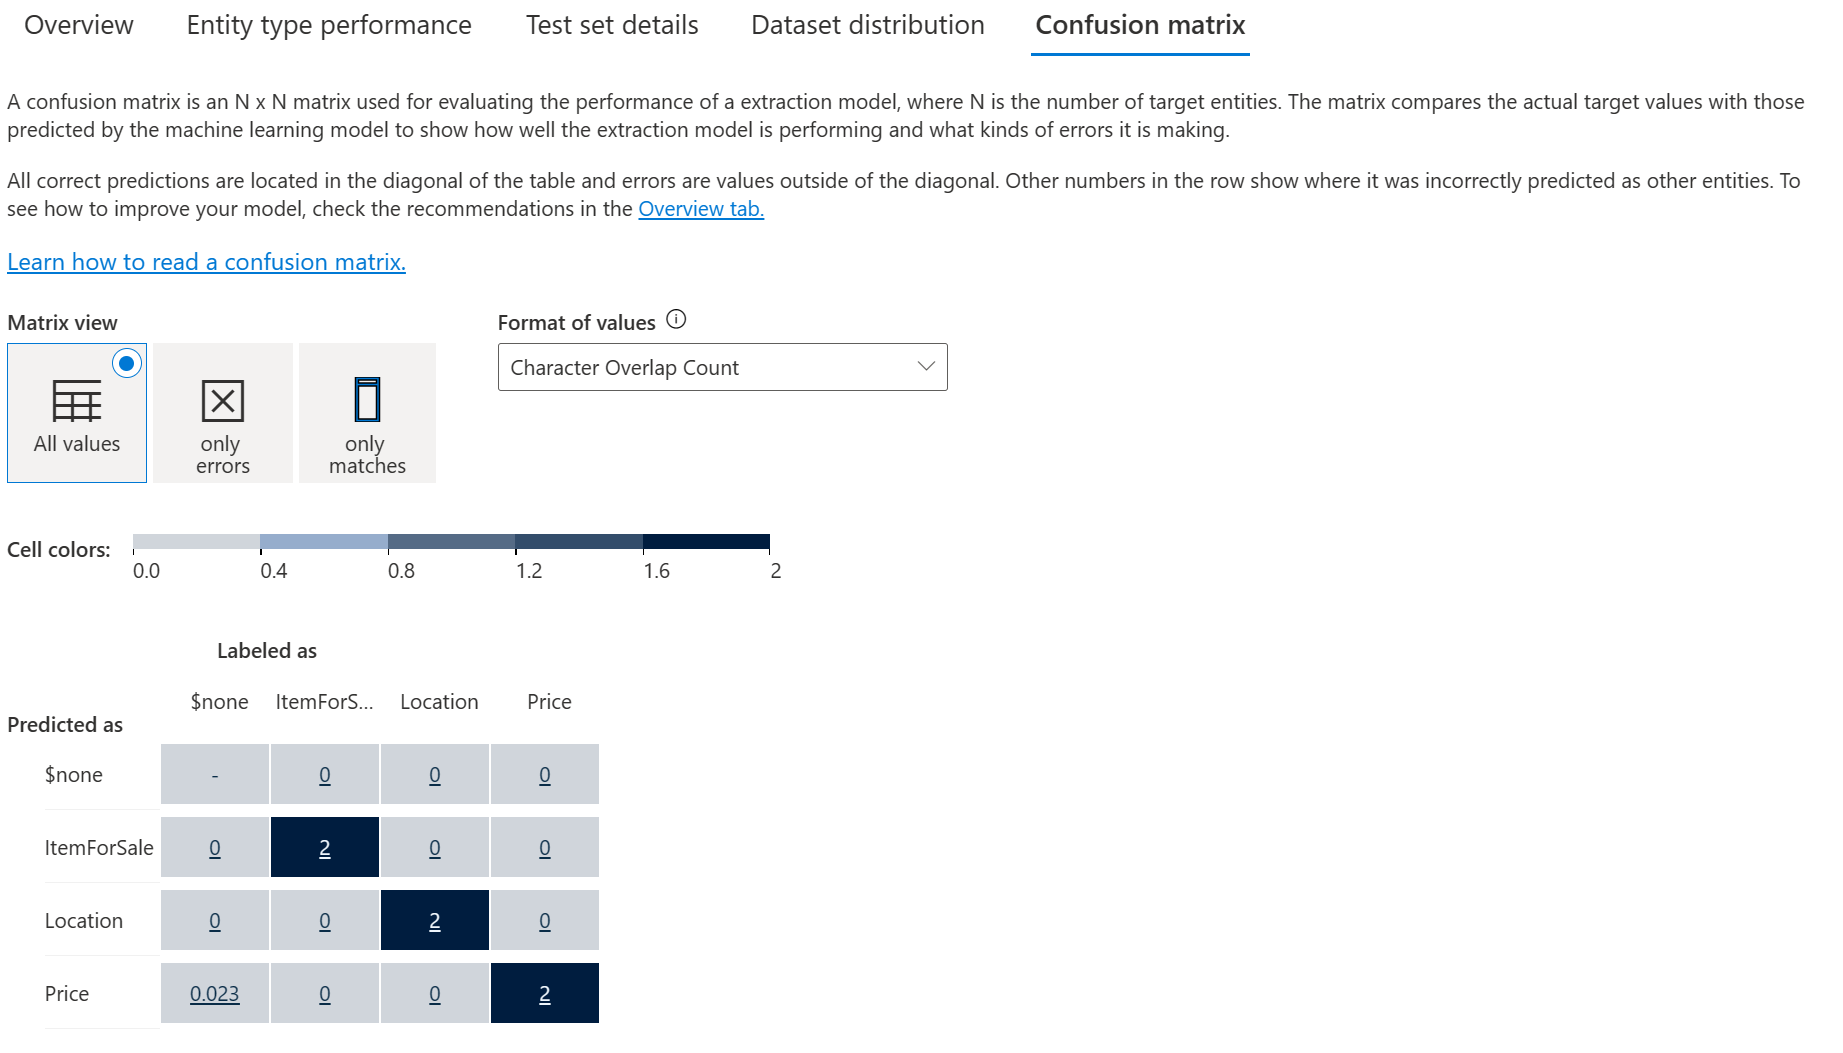
The confusion matrix allows you to visually identify where to add data to improve your model's performance.
Custom text classification assigns labels, which in the Azure AI Language service is a class that the developer defines, to text files. For example, a video game summary might be classified as "Adventure", "Strategy", "Action" or "Sports".
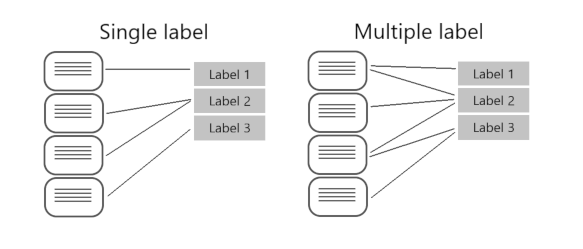
Custom text classification falls into two types of projects:
When creating your custom text classification project, you can specify which project you want to build.
Beyond the ability to put files into multiple classifications, the key differences with multiple label classification projects are labeling, considerations for improving your model, and the API payload for classification tasks.
In single label projects, each file is assigned one class during the labeling process; class assignment in Azure AI Language only allows you to select one class.
When labeling multiple label projects, you can assign as many classes that you want per file. The impact of the added complexity means your data has to remain clear and provide a good distribution of possible inputs for your model to learn from.
Labeling data correctly, especially for multiple label projects, is directly correlated with how well your model performs. The higher the quality, clarity, and variation of your data set is, the more accurate your model will be.
Measuring predictive performance of your model goes beyond how many predictions were correct. Correct classifications are when the actual label is x and the model predicts a label x. In the real world, documents result in different kinds of errors when a classification isn't correct:
These metrics are translated into three measures provided by Azure AI Language:
Tip
Learn more about the Azure AI Language evaluation metrics, including exactly how these metrics are calculated
With a single label project, you can identify which classes aren't classified as well as others and find more quality data to use in training your model. For multiple label projects, figuring out quality data becomes more complex due to the matrix of possible permutations of combined labels.
For example, let's your model is correctly classifying "Action" games and some "Action and Strategy" games, but failing at "Strategy" games. To improve your model, you'll want to find more high quality and varied summaries for both "Action and Strategy" games, as well at "Strategy" games to teach your model how to differentiate the two. This challenge increases exponentially with more possible classes your model is classifying into.
Azure AI Language provides a REST API to build and interact with your model, using a JSON body to specify the request. This API is abstracted into multiple language-specific SDKs, however for this module we'll focus our examples on the base REST API.
To submit a classification task, the API requires the JSON body to specify which task to execute. You'll learn more about the REST API in the next unit, but worth familiarizing yourself with parts of the required body.
Single label classification models specify a project type of customSingleLabelClassification
{
  "projectFileVersion": "<API-VERSION>",
  "stringIndexType": "Utf16CodeUnit",
  "metadata": {
    "projectName": "<PROJECT-NAME>",
    "storageInputContainerName": "<CONTAINER-NAME>",
    "projectKind": "customSingleLabelClassification",
    "description": "Trying out custom multi label text classification",
    "language": "<LANGUAGE-CODE>",
    "multilingual": true,
    "settings": {}
  },
  "assets": {
    "projectKind": "customSingleLabelClassification",
        "classes": [
            {
                "category": "Class1"
            },
            {
                "category": "Class2"
            }
        ],
        "documents": [
            {
                "location": "<DOCUMENT-NAME>",
                "language": "<LANGUAGE-CODE>",
                "dataset": "<DATASET>",
                "class": {
                    "category": "Class2"
                }
            },
            {
                "location": "<DOCUMENT-NAME>",
                "language": "<LANGUAGE-CODE>",
                "dataset": "<DATASET>",
                "class": {
                    "category": "Class1"
                }
            }
        ]
    }
}
Multiple label classification models specify a project type of CustomMultiLabelClassification
{
  "projectFileVersion": "<API-VERSION>",
  "stringIndexType": "Utf16CodeUnit",
  "metadata": {
    "projectName": "<PROJECT-NAME>",
    "storageInputContainerName": "<CONTAINER-NAME>",
    "projectKind": "customMultiLabelClassification",
    "description": "Trying out custom multi label text classification",
    "language": "<LANGUAGE-CODE>",
    "multilingual": true,
    "settings": {}
  },
  "assets": {
    "projectKind": "customMultiLabelClassification",
    "classes": [
      {
        "category": "Class1"
      },
      {
        "category": "Class2"
      }
    ],
    "documents": [
      {
        "location": "<DOCUMENT-NAME>",
        "language": "<LANGUAGE-CODE>",
        "dataset": "<DATASET>",
        "classes": [
          {
            "category": "Class1"
          },
          {
            "category": "Class2"
          }
        ]
      },
      {
        "location": "<DOCUMENT-NAME>",
        "language": "<LANGUAGE-CODE>",
        "dataset": "<DATASET>",
        "classes": [
          {
            "category": "Class2"
          }
        ]
      }
    ]
  }
}
When labeling your data, you can specify which dataset you want each file to be:
During the Train model step, there are two options for how to train your model.
To use the automatic split, put all files into the training dataset when labeling your data (this option is the default). To use the manual split, specify which files should be in testing versus training during the labeling of your data.
Azure AI Language allows each project to create both multiple models and multiple deployments, each with their own unique name. Benefits include ability to:
Note
Each project has a limit of ten deployment names
During deployment you can choose the name for the deployed model, which can then be selected when submitting a classification task:
<...>
  "tasks": [
    {
      "kind": "CustomSingleLabelClassification",
      "taskName": "MyTaskName",
      "parameters": {
        "projectName": "MyProject",
        "deploymentName": "MyDeployment"
      }
    }
  ]
<...>
Preconfigured
Learned Features
First, you'll need to create your Azure AI Language resource in the Azure portal. Then:
Once that resource has been created, you'll need a key and the endpoint. You can find that on the left side under Keys and Endpoint of the resource overview page.
Alternatively you can use Language Studio for the same
You'll need to submit a request to the appropriate URI for each step, and then send another request to get the status of that job.
For example, if you want to deploy a model for a conversational language understanding project, you'd submit the deployment job, and then check on the deployment job status.
Authentication
For each call to your Azure AI Language resource, you authenticate the request by providing the following header.
| Key | Value |
|---|---|
| Ocp-Apim-Subscription-Key | The key to your resource |
Request Deployment
Submit a POST request to the following endpoint.
{ENDPOINT}/language/authoring/analyze-conversations/projects/{PROJECT-NAME}/deployments/{DEPLOYMENT-NAME}?api-version={API-VERSION}
Include the following body with your request.
{
  "trainedModelLabel": "{MODEL-NAME}",
}
| Placeholder | Value |
|---|---|
| The model name that will be assigned to your deployment. This value is case-sensitive. |
Successfully submitting your request will receive a 202 response, with a response header of operation-location. This header will have a URL with which to request the status, formatted like this:
{ENDPOINT}/language/authoring/analyze-conversations/projects/{PROJECT-NAME}/deployments/{DEPLOYMENT-NAME}/jobs/{JOB-ID}?api-version={API-VERSION}
Get Deployment Status
Submit a GET request to the URL from the response header above. The values will already be filled out based on the initial deployment request.
{ENDPOINT}/language/authoring/analyze-conversations/projects/{PROJECT-NAME}/deployments/{DEPLOYMENT-NAME}/jobs/{JOB-ID}?api-version={API-VERSION}
| Placeholder | Value |
|---|---|
| The endpoint for authenticating your API request | |
| The name for your project (case-sensitive) | |
| The name for your deployment (case-sensitive) | |
| The ID for locating your model's training status, found in the header value detailed above in the deployment request | |
| The version of the API you're calling | |
| The response body will give the deployment status details. The status field will have the value of succeeded when the deployment is complete. |
{
    "jobId":"{JOB-ID}",
    "createdDateTime":"String",
    "lastUpdatedDateTime":"String",
    "expirationDateTime":"String",
    "status":"running"
}
For a full walkthrough of each step with example requests, see the conversational understanding quickstart.
To query your model for a prediction, you can use SDKs in C# or Python, or use the REST API.
To query your model using an SDK, you first need to create your client. Once you have your client, you then use it to call the appropriate endpoint.
language_client = TextAnalyticsClient(
            endpoint=endpoint,
            credential=credentials)
response = language_client.extract_key_phrases(documents = documents)[0]
Other language features, such as the conversational language understanding, require the request be built and sent differently.
result = client.analyze_conversation(
    task={
        "kind": "Conversation",
        "analysisInput": {
            "conversationItem": {
                "participantId": "1",
                "id": "1",
                "modality": "text",
                "language": "en",
                "text": query
            },
            "isLoggingEnabled": False
        },
        "parameters": {
            "projectName": cls_project,
            "deploymentName": deployment_slot,
            "verbose": True
        }
    }
)
To query your model using REST, create a POST request to the appropriate URL with the appropriate body specified. For built in features such as language detection or sentiment analysis, you'll query the analyze-text endpoint.
Tip
Remember each request needs to be authenticated with your Azure AI Language resource key in the Ocp-Apim-Subscription-Key header
{ENDPOINT}/language/:analyze-text?api-version={API-VERSION}
| Placeholder | Value |
|---|---|
| The endpoint for authenticating your API request | |
| The version of the API you're calling |
Within the body of that request, you must specify the kind parameter, which tells the service what type of language understanding you're requesting.
If you want to detect the language, for example, the JSON body would look something like the following.
{
    "kind": "LanguageDetection",
    "parameters": {
        "modelVersion": "latest"
    },
    "analysisInput":{
        "documents":[
            {
                "id":"1",
                "text": "This is a document written in English."
            }
        ]
    }
}
Other language features, such as the conversational language understanding, require the request be routed to a different endpoint. For example, the conversational language understanding request would be sent to the following.
{ENDPOINT}/language/:analyze-conversations?api-version={API-VERSION}
| Placeholder | Value |
|---|---|
| The endpoint for authenticating your API request | |
| The version of the API you're calling | |
| That request would include a JSON body similar to the following. |
{
  "kind": "Conversation",
  "analysisInput": {
    "conversationItem": {
      "id": "1",
      "participantId": "1",
      "text": "Sample text"
    }
  },
  "parameters": {
    "projectName": "{PROJECT-NAME}",
    "deploymentName": "{DEPLOYMENT-NAME}",
    "stringIndexType": "TextElement_V8"
  }
}
| Placeholder | Value |
|---|---|
| The name of the project where you built your model | |
| The name of your deployment |
The query response from an SDK will in the object returned, which varies depending on the feature (such as in response.key_phrases or response.Value). The REST API will return JSON that would be similar to the following.
{
    "kind": "KeyPhraseExtractionResults",
    "results": {
        "documents": [{
            "id": "1",
            "keyPhrases": ["modern medical office", "Dr. Smith", "great staff"],
            "warnings": []
        }],
        "errors": [],
        "modelVersion": "{VERSION}"
    }
}
For other models like conversational language understanding, a sample response to your query would be similar to the following.
{
  "kind": "ConversationResult",
  "result": {
    "query": "String",
    "prediction": {
      "topIntent": "intent1",
      "projectKind": "Conversation",
      "intents": [
        {
          "category": "intent1",
          "confidenceScore": 1
        },
        {
          "category": "intent2",
          "confidenceScore": 0
        }
      ],
      "entities": [
        {
          "category": "entity1",
          "text": "text",
          "offset": 7,
          "length": 4,
          "confidenceScore": 1
        }
      ]
    }
  }
}
The SDKs for both Python and C# return JSON that is very similar to the REST response.
For full documentation on features, including examples and how-to guides, see the Azure AI Language documentation documentation pages.
The REST API available for the Azure AI Language service allows for CLI development of Azure AI Language projects in the same way that Language Studio provides a user interface for building projects. Language Studio is explored further in this module's lab.
The API for the Azure AI Language service operates asynchronously for most calls. In each step we submit a request to the service first, then check back with the service via a subsequent call to get the status or result.
With each request, a header is required to authenticate your request:
Expand table
| Key | Value |
|---|---|
| Ocp-Apim-Subscription-Key | The key to your Azure AI Language resource |
The URL to submit the request to varies on which step you are on, but all are prefixed with the endpoint provided by your Azure AI Language resource.
For example, to train a model, you would create a POST to the URL that would look something like the following:
<YOUR-ENDPOINT>/language/analyze-text/projects/<PROJECT-NAME>/:train?api-version=<API-VERSION>
The following body would be attached to the request:
    {
        "modelLabel": "<MODEL-NAME>",
        "trainingConfigVersion": "<CONFIG-VERSION>",
        "evaluationOptions": {
            "kind": "percentage",
            "trainingSplitPercentage": 80,
            "testingSplitPercentage": 20
        }
    }
| Key | Value |
|---|---|
| < YOUR-MODEL > | Your model name. |
| trainingConfigVersion | The model version to use to train your model. |
| runValidation | Boolean value to run validation on the test set. |
| evaluationOptions | Specifies evaluation options. |
| kind | Specifies data split type. Can be percentage if you're using an automatic split, or set if you manually split your dataset |
| testingSplitPercentage | Required integer field only if type is percentage. Specifies testing split. |
| trainingSplitPercentage | Required integer field only if type is percentage. Specifies training split. |
The response to the above request will be a 202, meaning the request was successful. Grab the location value from the response headers, which will look similar to the following URL:
<ENDPOINT>/language/analyze-text/projects/<PROJECT-NAME>/train/jobs/<JOB-ID>?api-version=<API-VERSION>
| Key | Value |
|---|---|
| < JOB-ID > | Identifier for your request |
This URL is used in the next step to get the training status.
To get the training status, use the URL from the header of the request response to submit a GET request, with same header that provides our Azure AI Language service key for authentication. The response body will be similar to the following JSON:
{
  "result": {
    "modelLabel": "<MODEL-NAME>",
    "trainingConfigVersion": "<CONFIG-VERSION>",
    "estimatedEndDateTime": "2023-05-18T15:47:58.8190649Z",
    "trainingStatus": {
      "percentComplete": 3,
      "startDateTime": "2023-05-18T15:45:06.8190649Z",
      "status": "running"
    },
    "evaluationStatus": {
      "percentComplete": 0,
      "status": "notStarted"
    }
  },
  "jobId": "<JOB-ID>",
  "createdDateTime": "2023-05-18T15:44:44Z",
  "lastUpdatedDateTime": "2023-05-18T15:45:48Z",
  "expirationDateTime": "2023-05-25T15:44:44Z",
  "status": "running"
}
Training a model can take some time, so periodically check back at this status URL until the response status returns succeeded. Once the training has succeeded, you can view, verify, and deploy your model.
Using the model to classify text follows the same pattern as outlined above, with a POST request submitting the job and a GET request to retrieve the results.
To use your model, submit a POST to the analyze endpoint at the following URL:
<ENDPOINT>/language/analyze-text/jobs?api-version=<API-VERSION>
Important
Remember to include your resource key in the header for Ocp-Apim-Subscription-Key
The following JSON structure would be attached to the request:
{
  "displayName": "Classifying documents",
  "analysisInput": {
    "documents": [
      {
        "id": "1",
        "language": "<LANGUAGE-CODE>",
        "text": "Text1"
      },
      {
        "id": "2",
        "language": "<LANGUAGE-CODE>",
        "text": "Text2"
      }
    ]
  },
  "tasks": [
     {
      "kind": "<TASK-REQUIRED>",
      "taskName": "<TASK-NAME>",
      "parameters": {
        "projectName": "<PROJECT-NAME>",
        "deploymentName": "<DEPLOYMENT-NAME>"
      }
    }
  ]
}
| Key | Value |
|---|---|
| < TASK-REQUIRED > | Which task you're requesting. The task is CustomMultiLabelClassification for multiple label projects, or CustomSingleLabelClassification for single label projects |
| < LANGUAGE-CODE > | The language code such as en-us. |
| < TASK-NAME > | Your task name. |
| < PROJECT-NAME > | Your project name. |
| < DEPLOYMENT-NAME > | Your deployment name. |
The response to the above request will be a 202, meaning the request was successful. Look for the operation-location value in the response headers, which will look something like the following URL:
<ENDPOINT>/language/analyze-text/jobs/<JOB-ID>?api-version=<API-VERSION>
| Key | Value |
|---|---|
| < YOUR-ENDPOINT > | The endpoint for your API request |
| < JOB-ID > | Identifier for your request |
This URL is used to get your task results.
Submit a GET request to the endpoint from the previous request, with the same header for authentication. The response body will be similar to the following JSON:
{
  "createdDateTime": "2023-05-19T14:32:25.578Z",
  "displayName": "MyJobName",
  "expirationDateTime": "2023-05-19T14:32:25.578Z",
  "jobId": "xxxx-xxxxxx-xxxxx-xxxx",
  "lastUpdateDateTime": "2023-05-19T14:32:25.578Z",
  "status": "succeeded",
  "tasks": {
    "completed": 1,
    "failed": 0,
    "inProgress": 0,
    "total": 1,
    "items": [
      {
        "kind": "customSingleClassificationTasks",
        "taskName": "Classify documents",
        "lastUpdateDateTime": "2022-10-01T15:01:03Z",
        "status": "succeeded",
        "results": {
          "documents": [
            {
              "id": "<DOC-ID>",
              "class": [
                  {
                      "category": "Class_1",
                      "confidenceScore": 0.0551877357
                  }
              ],
              "warnings": []
            }
          ],
          "errors": [],
          "modelVersion": "2022-04-01"
        }
      }
    ]
  }
}
The classification result is within the items array's results object, for each document submitted.